Showing posts with label PC/COMPUTER. Show all posts

Monday, May 27, 2019

Installing Windows Server 2016 ISO with Virtio on Vultr

Here could be a fast and straightforward guide to uploading and installing a Windows Server 2016 iso on Vultr cheaply. Vultr could be a trustworthy and reliable cloud computing business with a huge varies of locations, options and VPS arrange sizes, check them out here.
Promo: Click here to induce free $50 credit to use with Vultr
** guide here for Windows Server 2019
** guide here for Windows 10 professional
At Vultr windows, servers cost additional however, you get the choice to upload your own ISO file to use on the server. As this guide shows you the way to try to upload and install of a Windows Server 2016.
Go to the deploy server section; you would like to transfer the custom Windows Server 2016 ISO, use this link here (minimal version, Has solely English and Chinese simplified) or build your own and host it.
Scroll right down to section a pair of (Server type) and click on the “Upload ISO” tab and so the “Upload ISO” button below it, add within the universal resource locator and click on transfer (you’ll have to be compelled to wait some minutes for it to upload). NOTE: you'll be able to solely have a pair of ISO’s uploaded and hold on at a similar time.

Scroll down and select your server location.
By currently the ISO ought to have loaded check that its hand-picked (Server2016Litex64.iso ). currently select your instance size (amount of SSD house, ram and central processing unit amount). Do note that Windows Server 2016 can run fine on the $5 per month possibility.
Don't worry regarding any of the opposite choices (Additional options, startup scripts, SSH Keys), kind in a very server hostname and label currently click “Deploy now”.
Navigate to the server info page for the server you only deployed. you'll have to be compelled to wait up to one or two of minutes for the ISO to be mounted, once it's done, click the limited monitor within the higher right to look at the console.

You will be greeted with this once it's been mounted:

Click next (This ISO solely has English or Chinese Simplified).

Click the Install currently button.

Click Custom: Install Windows solely (advanced).

Select Drive zero (or the drive with most space/ your boot drive) and click on next.

 Wait a few moments for it to be installed.

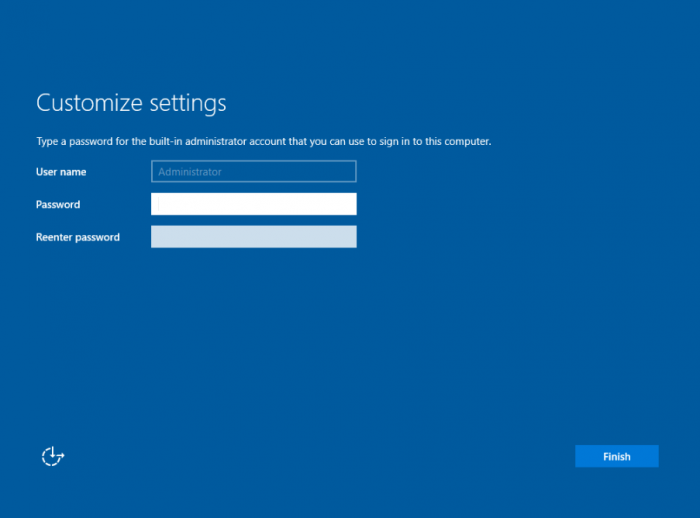
Set the Administrators Login password.

Now press the Send CtrlAltDel button within the high right, kind within the word you only set and log in.

 You will currently be logged in and also the network is mechanically designed. You’ll get a prompt asking if this laptop ought to be used on this network click affirmative.
Enjoy your Windows Server 2016 information centre analysis.

Installing Windows 10 professional ISO with Virtio on Vultr

This is a fast and simple guide on uploading and putting in a Windows 10 professional iso with Vultr cheaply. Vultr could be a trustworthy and reliable cloud computing business with a vast vary of locations, options and VPS arrange sizes, check all of them out here.

Promo: Click here to get free $50 credit to Currently with Vultr

** guide here for Windows Server 2019

With Vultr windows servers value further however you get the choice to transfer your own ISO file to use on the server. As this guide shows you ways to try and do the transfer and install a Windows ten professional ISO.
Go into the deploy server section; you wish to transfer the custom Windows ten professional ISO, use this link here (Compact version) or build your own and host it.
Scroll all the way down to section two (Server type) and click on the “Upload ISO” tab then the “Upload ISO” button below it, add within the computer address and click on transfer (you ought to wait a number of minutes for it to upload). NOTE: you'll solely have two ISO’s uploaded and hold on at a similar time.

Scroll up and opt for your server location.
By now currently, the Windows ten ISO ought to have loaded, ensure its hand-picked (Win10Pro.iso ). currently opt for your instance size (amount of SSD area, ram and central processing unit amount). Do note that Windows ten can run fine on the $5 per month possibility.
Don't worry concerning any of the opposite choices (Additional options, startup scripts, SSH Keys), sort during a server hostname and label currently click “Deploy now”.

Navigate to the server info page for the server you only deployed. you ought to wait up to some of the minutes for the ISO to be mounted, once it's clicked the tiny monitor within the higher right to look at the console.

You will be greeted with this once it's been mounted:


Choose a language, time and keyboard then click Next.


Click: Install currently


Accept the license terms and then click Next


Choose rock bottom possibility “Custom: Install Windows solely (advanced)” by clicking it


Choose your boot drive, the most drive. Click Next


Now it'll undergo the particular install, this can take concerning five minutes.


Now you may undergo the Windows ten setup


Choose your region and click on affirmative


Choose setup for private use
You will then get asked concerning AN account, click the offline account within the bottom left. this suggests you may produce AN account and not use a Microsoft account (MSN, Hotmail, Xbox etc).
Choose and set your username click Next then enter your watchword

Turn of all the privacy choices, click settle for.

Your install ought to be finished currently and therefore the network configuration is done mechanically.
You should currently be logged in and have free use of Windows ten professional on Vultr.

Tuesday, May 14, 2019

Free VPS FOR LIFE NEW METHOD WITH FULL TUTORIAL

Free VPS FOR LIFE NEW METHOD WITH FULL TUTORIAL

Here is the Full tutorial:

First Register in any of the below links and follow along: 


and create an account, after creating an account goto container tab and create a container, starting the container.

1. Install and Configure VNC Server

 sudo apt update

 sudo apt -y install vnc4server

2. Install Desktop Enviroment


XFCE 
sudo apt install xfce4 xfce4-goodies -y 

                      OR
FLUXBOX

sudo apt-get install fluxbox

LXDE
LXDE_LITE

sudo apt-get install lxde

MATE


sudo apt-get install mate-desktop-environment-core

3. Set a secure access password

 vncpasswd


4. Start VNC server

sudo vncserver -geometry 1366x768

INSTALL NGROK FOR PORT FORWARD:

wget https://bin.equinox.io/c/4VmDzA7iaHb/ngrok-stable-linux-386.zip&& unzip *.zip

./ngrok tcp 5901

6.  Connect on VNC viewer

ENJOY